Made using
  with
with  (Love css but I'm old school.)
 Not optimized for mobile.
 Feeling overwhelmed. |
Hello and welcome to my cozy corner of the internet. This site was created sometime in December of 1994 but has been sitting on a floppy disk since. I've had a bit of time to bring it back to life but it seems that decades have passed and I need to make some necessary changes. Take a look at the code, I tried to use html that I've learned since the big bang of 1997. Some snippets are obsolete but suprisingly functional in today's modern browsers. I've also tried including a midi using the old embed tag, but couldn't get it to work. It does however operate under today's standards using the <audio> tag. If you have a suggestion, leave a post in the guestbook. If you haven't already noticed, there is quite a bit of FFIV references on this page. Not a big fan of the game but I enjoyed this particular series along with FFVII and FFXI. I may or may not add references to those as well in the future. If you'd like to see something in particular, let me know. |
|---|
|
I'll be using GIMP for this tutorial. You can get it here and it's free. It's probably one of the better known freeware programs for drawing and creating various type of image formats. It does have a learning curve, so be patient. Let's open Gimp and create a
The should be set to 88px and height set at 31px. Once you've created the file, you'll see your main window with the rectangle in the center. Let's fill in the color of our background. On the left hand panel, locate and select the icon and make sure fill is chosen. You can choose a color by clicking on the active foreground box. A window with change foreground color will appear, you can play around with color selection here. Once you've chosen a color, click on the rectangle and fill in with the new color. You'll notice the background changes along with the layer changing color on the right hand side panel. If you don't see layers, click on the Windows tab > Dockable Dialogs > Layers (or Ctrl + L ). Now that we've added color to our layer (Background), we'll create a . On the layers tab, locate the bottom left icon and click create new layer (or right click anywhere in the layers panel and select new layer). Rename your new layer to 'text' and click ok. You'll see a new addition to your background layer with a transparent background. Click on this layer to make sure it's selected. Now back on the left hand panel, locate and select the (Tools tab > Text ). Move your cursor to the rectangle and click anywhere you'd like the text to appear. by typing directly into the box. If you don't see anything, try changing the color of your text (change color of selected text) If it still doesn't work, click on the active foreground to change your color, then choose the text tool and add again. Once again, you can adjust the text size, font and color in the text tool window that appears. Once you finished typing in your text, click on File, then Save and save your new image. After you saved your image, click File, then click Export As and export it using the extension .gif (e.g., myfirstbanner.gif) That's it, you've learned how to make your first banner using GIMP. Here's a badge from me to you for sticking through it. . |
|---|
This guide will walk you through on how to animate your button into .gif format. Whether it's images, art or plain text, it's real easy to do. Let's get started. I'll be walking you through this tutorial in GIMP. You can get it here. If your new to GIMP, scroll up a bit and follow the first lesson on how to make a 88x31 button using GIMP. Open your gif, by clicking on File then . Once your file is open, look to the , usually off to the right. Notice any layers you may have. If it's only one, perfect. If it's multiple layers, we'll get to that in a moment. Create a duplicate of your layer by right clicking on the layer itself and selecting . Rename this layer to 'animate' just for . At this point you either have two layers or multiple. For now we'll focus on two layers. The first layer (bottom) is the original layer. Click on the so that the first layer is no longer visible. The second layer should be the only one visible. This is the layer we'll draw your million dollar art on. Click on this layer so its highlighted. From here you can add to this layer anything you want. Lets add a star using the . Click on the windows tab at the top menu, dockable dialogs then brushes (or Shift + Ctrl + B). By default, the brushes tab appears on the right panel. Choose any of the brushes and then select the from our tool dock. To draw or add the brush to your layer, simply hover over the canvas and click. If it doesn't show, check your foreground color to make sure the color's aren't the same. You should now have two different layers, the original and the second with the design. Duplicate your second layer and repeat the process, only this time, add your art on the third layer in a different spot. Once you've finished the design, save your work. Always save as a precaution, as time, isn't something you'll get back. Head to the top menu and click Filters > Animation > Playback. In the window that appears is where we can view your animated image frame by frame. Click the play button to see it as a loop, or click on the right and left buttons to view frame by frame. For each frame begins at layer 1 and works bottom to top. Go frame by frame to get a visual of what you need to edit. Once your satisifed with the animation, click on File then Export As.. Rename with the extension. A new window will appear, Export Image as GIF. Under , select As Animation and check loop forever. You can adjust the settings here for time inbetween frames as well. Click Export to save the file . Congratulations, you gained a |
|
|---|
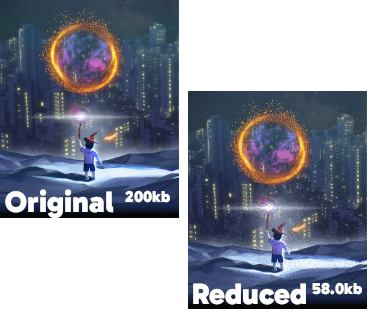
| How? Two things, rescale the size of your original image and reduce the colors of your thumbnail. Rescaling helps the end user view your images that are web friendly. In other words, it'll speed the waiting time. It's good practice to use a thumbnail that links to your original or scaled photo for that "optimal viewing experience". If your images look like their loading from the 1900's, people will fall asleep and move on to the next. So lets help you make your photos load faster. You can use sites available online to reduce your images. While there are plenty of resources that offer free services, know you will be uploading your photo to their server. For this tutorial, we'll keep them locally, by using GIMP. Let's start by opening your photo in GIMP by clicking on File > Open. Select a photo you'd like to resize. Now click on Image > Scale Image. We want to reduce the image of the size that works with your website. For now let's do a sample, then you can retweak the final size to your choosing. Under Image Size, set the width and height to 150 pixels and click scale. Now go to Image > Mode > Indexed. Here you'll see the Colormap. Under Generate optimum palette, adjust the maximum number of colors. The higher the number, the more colors used and the larger your file size will be. We want to reduce the amount of colors thus reducing the file size of your thumbnail. Once you've selected a number, click Convert to apply the adjustments. Goto File, then Export As and save your file using the .gif extension. That's it! You can view the |
|---|
| Item | Quantity | Price |
|---|---|---|
| Avocado | 10 lbs | $$ |
| Bananas | 2 lbs | $$ |
| Eggs | 1 dozen | $$ |
 |
 |
 |
 |
 |
 |
 |
 |
 |
 |
 |
 |
 |
 |
 |
 |
 |
 |
 |
|
| This site www.2advanced.com was way ahead of it's time back in the Y2K. However, this new generation.....is on an entirely different planet....and it's amazing. |
| Browse a pc as it was in the early 90s. | bills world |
| If Neo and Trinity had a child, he's the one. | kidwiththechemicalz |
| The aesthetic is nostalgic | lost love |
| Nothing better than a homebrewed cafe | onio cafe |
| Indulging story writer | fairy gore |
| Collection of Japanese electronics | 7nonsense |
| Keeping the legacy alive | daniels virtual place |
| and much, much more only at neocities |